
Tourplan accounting is Open Item. Credit Notes can only be applied against an already existing invoice.
A credit note can be applied against a previously entered creditor’s invoice.

|
Tourplan accounting is Open Item. Credit Notes can only be applied against an already existing invoice. |
To insert a Creditors Credit Note, first select the Creditor the invoice has been received from, and then select Transactions in the side bar. Click on the Insert button  in the Button bar. From the Insert Transaction screen displayed, select Credit Note.
Screen Shot 144: Creditors Credit Note Header
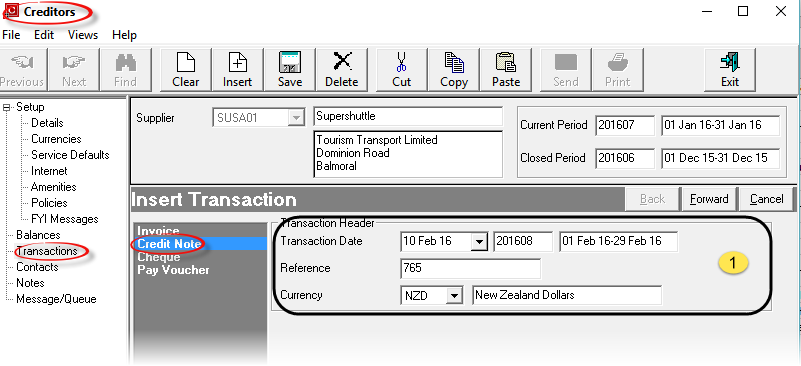
 Credit Note Header Section
Transaction Date (Date)
Credit Notes always default to current system date. The Transaction Period number displays to the right of the Date field, and the corresponding Start Date/End Date of the period display to the right of the period number. The Transaction Date can be overridden. Credit Notes always inherit the age period of the invoice to which they are applied. The Transaction Date must be in an open period — the system will not allow a transaction date which is in a closed accounting period.
Reference (20 Chars)
The Credit Note Number. This is the reference number on the credit note from the supplier.

|
If there is no reference number on the credit note. It is not recommended that the booking reference be used as this can lead to confusion during reconciliation. The system will not allow the same reference as any existing invoice, credit note or cheque reference, within the same supplier. |
Currency (Drop-down)
The currency that the credit will be issued in. This can be changed to any of the currencies that are attached to the agent. The currency which was checked as the default in during agent set up is the one which displays by default.

|
A Credit Note cannot be issued in a currency which is different to the currency of the invoice the credit applies to. When selecting the invoice to apply the credit to (Screen Shot 146 Search By Creditors Invoice Reference Results), only invoices with the same currency as entered in this header screen will be available for selection. |

|
Click the Forward Button on the Wizard Bar to continue. The Credit Note Line Entry window will overlay the Transaction Header Screen. |

|
Click the Cancel Button to cancel the Credit Note |

|
The fields in the Voucher Detail section of this dialogue box can be used to filter specific service line(s) to include in the scroll. The Apply To and Credit Details sections will be completed when an invoice or invoice line selection has been made. |
Screen Shot 145: Creditors Credit Note Line Entry
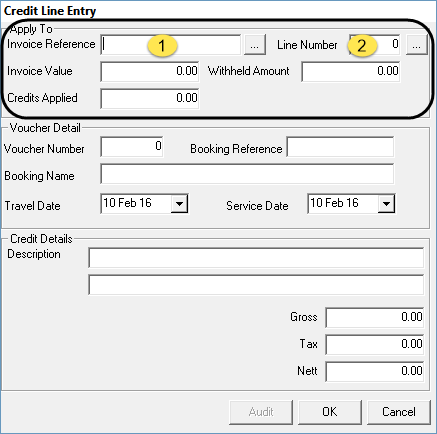
Credits can be applied against an invoice total or against a specific line of the invoice. This is controlled by the two Apply To fields at the top of the screen - Invoice Reference ( ) and Line Number (
 ).
).
Invoice Reference (20 Chars, Search)
If the reference number of the invoice being credited is known, it can be entered in this field. Clicking the Search button  will list invoices in the Credit Note Header currency that are available for credit.
Screen Shot 146: Search By Creditors Invoice Reference Results

The Invoice by Invoice Number search will return the totals of any invoices available for credit.
Line Number (Integer, Search)
If a specific line number of an invoice is to be credited, clicking the Search button next to Line Number will display the individual lines of all invoices available for credit.
Screen Shot 147: Search By Creditors Invoice Line Results 

The Invoice by Invoice Line search will return the individual lines of the invoices available for credit.

|
The column headings at the top of both of these scrolls are the only column headings available in these screens. |

|
If an invoice has been selected from the list in the Credit Line Entry dropdown, then the individual lines of only that invoice can be viewed by then clicking the invoice lines search button. |

|
To continue, highlight the invoice or line to be credited and click the OK button |

|
To cancel, click the Cancel button. |
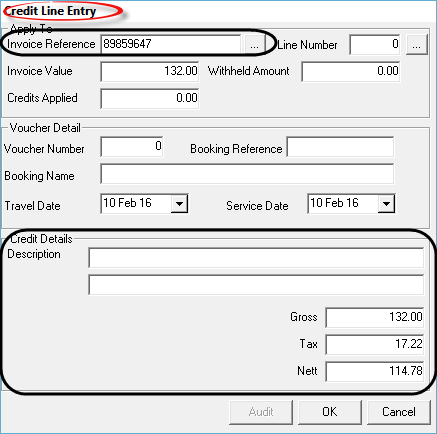
Screen Shot 148: Creditors Credit Line Entry – Invoice Ref. Selected

|
When an Invoice Reference is selected, the Line Number field is blank, and the Credit Details Gross field defaults to the total value (less existing credits) of the invoice. |
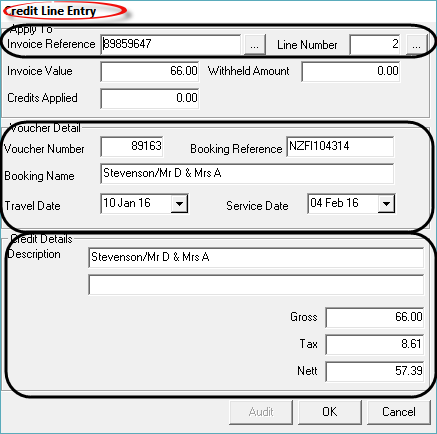
Screen Shot 149: Creditors Credit Line Entry – Line Number Selected

|
When a Line Number is selected, both the Invoice Reference and Line Number fields are populated , and the Credit Details Gross field defaults to the total (less credits) of the Line value. |
Apply To Section
Invoice Value (Display Only)
This will display the value of either the invoice selected or the invoice line selected.
Credits Applied (Display Only)
This field displays the value of any credits which may have already been applied against the item selected for credit.
Voucher Detail Section (Used only when Line Selection Made)
Voucher Number (Display Only)
The voucher number that the invoice line applied to.
Booking Reference (Display Only)
The booking reference that the invoice line applied to.
Booking Name (Display Only)
The booking name that the invoice line applied to.
Travel Date (Display Only)
The travel date of the booking that the invoice line applied to.
Service Date (Display Only)
The service date of the service that the invoice line applied to.
Credit Details Section (Applies to both Invoice and Line Selection)
Description
Two lines are available for text detail of the item. When a selection has been made by Line Number, the Booking Name defaults to line 1. The description lines can be overridden.
Gross
This will default to the gross (tax inclusive) value of the invoice or invoice line being credited. This value can be overridden.
Tax
This will default to the tax amount of the invoice or invoice line being credited. This value can be overridden.
Nett
This will default to the nett (of tax) value of the invoice or invoice line being credited—the presumption being that the full value is being credited. This value can be overridden.

|
When invoices or lines are displayed, only invoices or lines that feature the selected supplier will display. |
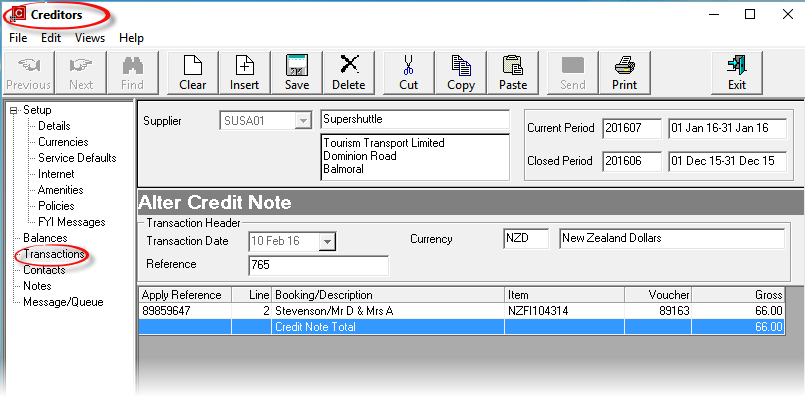
When all detail has been entered, clicking the OK button will display the screen in Screen Shot 150 Completed New Credit Note Lines.
Screen Shot 150: Completed New Credit Note Lines

|
The column headings at the top of the scroll are the only column headings available in this screen. |

|
Creditor’s Credit Notes cannot be printed or output in any way. |

|
If there are no additional lines to add to the Credit Note, click the Save button on the Button bar. |

|
If additional lines are to be added, click the Inset button on the button bar. The Invoice Line Detail dialogue as in Screen Shot 145 Creditors Credit Note Line Entry will re-display. |
When the save is completed, the Transaction List screen (Screen Shot 139 Creditor Transactions Screen) re-displays.